

How To Enable Touchpad On Lenovo Laptop Windows 10
How to disable or enable the touchpad on a laptop
Updated: 10/11/2021 past Reckoner Hope
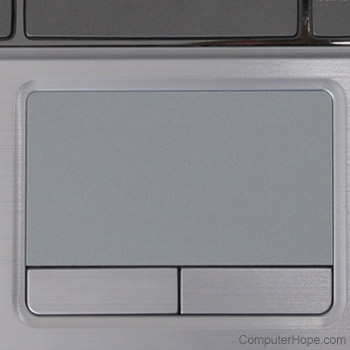
The touchpad on a laptop is a convenient way to add together the functionality of a mouse without needing an extra peripheral. When the touchpad is enabled or unlocked, the touchpad has the same functionality as an external mouse. When the touchpad is disabled or locked, the touchpad doesn't work, preventing the mouse cursor's adventitious movement with your palm while typing. When disabled, the demand for an external mouse is required.
The exact steps to enable or disable the touchpad may differ slightly, depending on the laptop's manufacturer, so you may need to use some intuition to achieve your desired outcome.
Steps to try starting time
TouchPad Push: Some laptops have a push button almost the meridian of the touchpad that allows you lot to apace enable and disable the touchpad. You can toggle the touchpad off and on with that button.
TouchPad Fn keys: Some laptops have an Fn key that, in combination with one of the F1 - F12 role keys, tin can enable and disable the touchpad. To toggle the touchpad off and on, press both of these shortcut keys at the same time.
Tip
The icon associated with toggling the touchpad is often indicated past a rectangle with a line under it. It may likewise have a pointing finger or a circle near or over a rectangle.
How to disable the touchpad in Windows 8 and 10
Using a mouse and keyboard
- Press the Windows key, type touchpad, and press Enter.
Or, press Windows key+I to open Settings and choose Devices, then Touchpad.
- In the Touchpad Settings window, click the Touchpad toggle switch to the Off position.

Using a keyboard only
- Press the Windows fundamental, type touchpad, and press Enter.
Or, press Windows fundamental+I to open up Settings and utilize the Tab, arrow keys, and Enter to choose Devices, then Touchpad.
- In the Touchpad settings window, press Tab until the Touchpad toggle switch is selected.
- Printing the spacebar to alter the toggle switch to the Off position.

How to disable the touchpad in Windows seven and earlier
Using a mouse and keyboard
- Press the Windows key, type Command Panel, and and then press Enter.
- Select Hardware and Sound.
- Under Devices and Printers, select Mouse.
- In the Mouse Properties window, select the tab labeled TouchPad, ClickPad, Device Settings, or something similar.
- There should be an option for enabling and disabling the TouchPad. It may be a button or a checkbox. Select the Disable option and click OK.
Note
If in that location are several devices listed in the Device Settings tab, you need to select the touchpad in the device list and and then click the Disable push.
Using a keyboard only
- Press the Windows central, type Control Panel, and press Enter.
- Employ your keyboard to navigate to Hardware and Sound, and press Enter.
- Apply your keyboard to navigate to Mouse (located under the Devices and Printers department) and press Enter.
- Use the keyboard combination Ctrl+Tab to move to the TouchPad, ClickPad, Device Settings, or similar tab, and printing Enter.
- Use your keyboard to navigate to the checkbox that allows you to enable or disable the touchpad. Press the spacebar to toggle to the off position.
Note
If using the Device Settings tab, press Tab until the Synaptics Touchpad or like touchpad device name is highlighted. If multiple devices are listed, you may need to press the upward or downwards arrow to select the touchpad device in the listing. Press Tab once again until the Disable push button is selected, so press Enter.
- Tab down and select Utilize, then OK.
How to disable the touchpad in macOS
With macOS, you lot cannot disable the MacBook trackpad until an external mouse is plugged in or connected via Bluetooth. Once you accept a mouse connected, follow the instructions below.
- In the card bar, click the Apple tree icon.
- Select Arrangement Preferences in the Apple menu.

- Scroll down to select the Pointer Control panel.
- Check the box for the Ignore built-in trackpad when mouse or wireless trackpad is nowadays option.
Note
When your external mouse is unplugged or otherwise disconnected, the trackpad is automatically enabled again.
How to disable the touchpad on a Chromebook
Disable touchpad tap-to-click functionality
The tap-to-click functionality for a Chromebook touchpad can exist turned off while still assuasive you to use the touchpad to move the mouse cursor. The steps below show you lot how to disable tap-to-click.
- Using the touchpad or a mouse, click the bottom-right corner of the Chromebook screen, where the fourth dimension and bombardment icon are located.
- In the window that pops upward, click the gear icon , normally located about the top-right or lesser-left corner, to access the Chromebook settings.
- In the Settings window, in the left navigation bill of fare, click the Device option.
- Scroll down to the Touchpad department. To the right of the Enable tap-to-click option, click the toggle to the off
 position.
Disable all touchpad functionality
To completely disable the Chromebook touchpad, follow the steps below.
- Open the Chrome browser.
- In the address bar at the top of the browser window, blazon chrome://flags/#ash-debug-shortcuts and press Enter.
- A listing of Chrome Bone settings is displayed. The superlative setting should be Debugging keyboard shortcuts and highlighted in xanthous. To the correct of that setting, click the drop-down menu and select Enabled.
- Click the Restart push button that appears in the lesser-right corner of the Chrome browser window.
- Later on the Chromebook restarts, press the Search cardinal+Shift+P keyboard shortcut to disable the touchpad.
Note
Once the touchpad is disabled, you need an external mouse to navigate on the Chromebook.
How to enable the touchpad in Windows 8 and ten
Using a mouse and keyboard
- Press the Windows primal, type touchpad, and printing Enter.
Or, press Windows cardinal+I to open Settings and choose Devices, then Touchpad.
- In the Touchpad settings window, click the Touchpad toggle switch to the On position.

Using a keyboard simply
- Press the Windows key, type touchpad, and printing Enter.
Or, press Windows key+I to open Settings and use the Tab key, arrow keys, and Enter key to choose Devices, then Touchpad.
- In the Touchpad Settings window, press Tab until the Touchpad toggle switch is selected.
- Printing the spacebar to change the toggle switch to the On position.

How to enable the touchpad in Windows 7 and before
Using a mouse and keyboard
- Press the Windows key, type Control Panel, and press Enter.
- Select Hardware and Sound.
- Nether Devices and Printers, select Mouse.
- In the Mouse Properties window, select the tab labeled TouchPad, ClickPad, Device Settings, or something similar.
- At that place should be an option for enabling and disabling the TouchPad. It may be a button or a checkbox. Select the Enable pick and click OK.
Note
If there are multiple devices listed in the Device Settings tab, y'all need to select the touchpad in the device list and so click the Enable push button.
Using the keyboard only
- Press the Windows key, type Control Panel, and printing Enter.
- Use your keyboard to navigate to Hardware and Audio, and press Enter.
- Use your keyboard to navigate to Mouse (located under the Devices and Printers section) and printing Enter.
- Utilise the keyboard combination Ctrl+Tab to move to the TouchPad, ClickPad, Device Settings, or the like option tab, and press Enter.
- Use your keyboard to navigate to the checkbox that allows you to enable or disable the touchpad. Press the spacebar to toggle it on or off.
Annotation
If using the Device Settings tab, printing Tab until the Synaptics Touchpad or similar touchpad device name is highlighted. If multiple devices are listed, you may demand to press the up or down pointer to select the touchpad device in the list. Printing Tab again until the Enable button is selected, then press Enter.
- Tab down and select Apply, then OK.
How to enable the touchpad in macOS
In macOS, the touchpad cannot be disabled entirely, but it can be temporarily disabled if a mouse is connected. If y'all have a mouse connected, disconnect the mouse and verify the touchpad is enabled and working again.
If you want the touchpad enabled fifty-fifty when a mouse is connected, follow the instructions below.
- In the menu bar, click the Apple tree icon.
- Select System Preferences in the Apple menu.
- Scroll down to select the Pointer Control panel.
- Uncheck the box for the Ignore congenital-in trackpad when mouse or wireless trackpad is present option.
Note
When your external mouse is unplugged or otherwise disconnected, the trackpad is automatically enabled again.
How to enable the touchpad on a Chromebook
Enable touchpad tap-to-click functionality
If the tap-to-click functionality for the Chromebook touchpad is disabled, follow the steps below to plow information technology back on.
- Using a mouse, click the bottom-right corner of the Chromebook screen, where the fourth dimension and battery icon are located.
- In the window that pops up, click the gear icon , usually located nearly the elevation-right or bottom-left corner, to access the Chromebook settings.
- In the Settings window, in the left navigation menu, click the Device selection.
- Whorl downwardly to the Touchpad section. To the right of the Enable tap-to-click choice, click the toggle to the on
 position.
Enable all touchpad functionality
To enable the touchpad, printing the Search key+Shift+P keyboard shortcut.
If pressing the keyboard shortcut does not enable the touchpad, the advanced keyboard shortcuts are probable disabled. To enable those shortcuts, follow the steps below.
- Open the Chrome browser.
- In the address bar at the height of the browser window, type chrome://flags/#ash-debug-shortcuts and press Enter.
- A listing of Chrome Bone settings is displayed. The tiptop setting should be Debugging keyboard shortcuts and highlighted in yellow. To the right of that setting, click the driblet-down menu and select Enabled.
- Click the Restart button that appears in the lesser-right corner of the Chrome browser window to restart the Chromebook.
Afterwards the Chromebook restarts, try pressing the Search fundamental+Shift+P keyboard shortcut over again. If the touchpad nevertheless is not enabled and working, the touchpad may exist defective and need to exist replaced.

How To Enable Touchpad On Lenovo Laptop Windows 10,
Source: https://www.computerhope.com/issues/ch001699.htm
Posted by: steffesblospas.blogspot.com
0 Response to "How To Enable Touchpad On Lenovo Laptop Windows 10"
Post a Comment